The following pages contain guidance for authors of this site on the mechanics of creating and editing content.
- Go to https://suttonpoyntz.org.uk/administrator
- Enter the username that you have been given, plus your password. Sometimes you will be told that you have an expired security token and have to enter the details a second time - this is annoying and there does not seem to be a way round it.
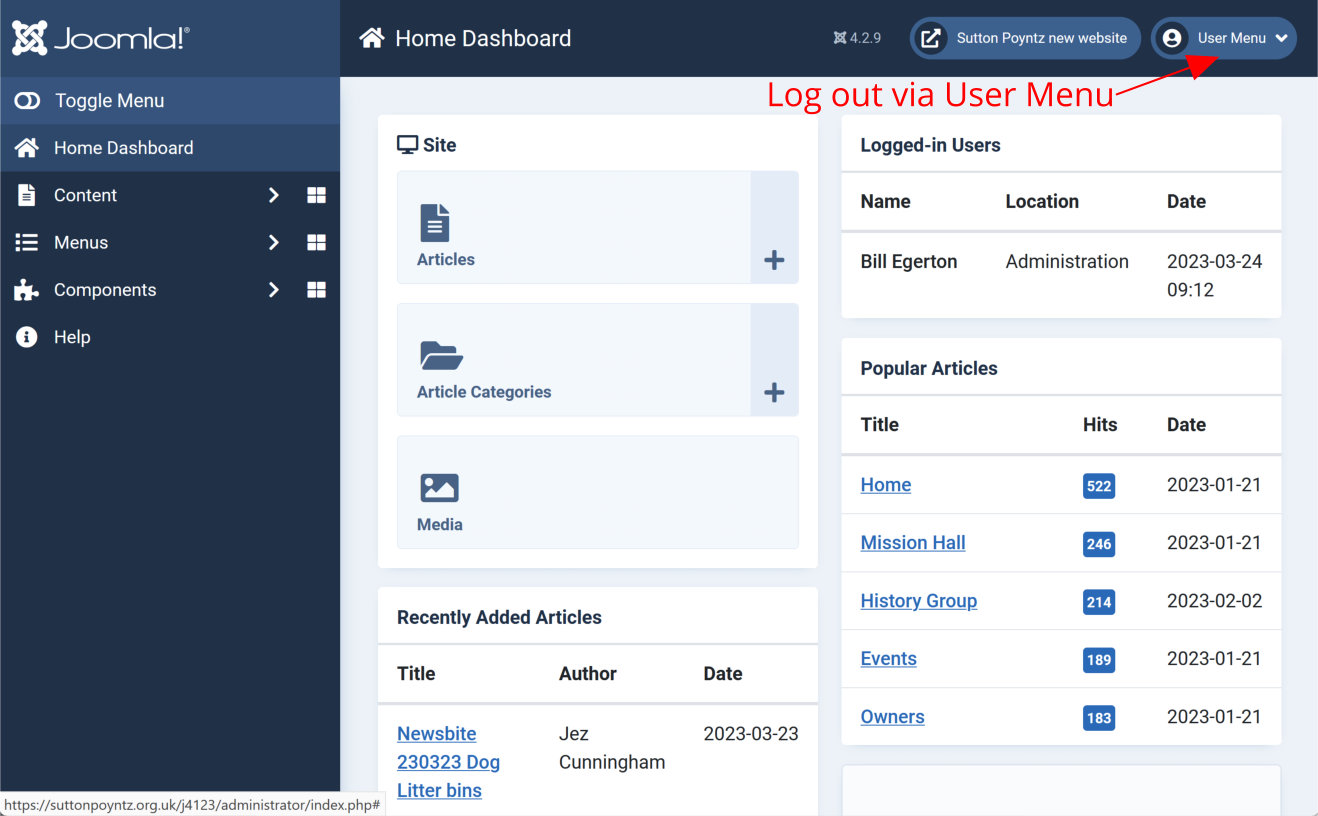
- You will be taken to the site Dashboard, looking something like the image below.
To log out, click User Menu (top right) and select Log Out.
- In the Dashboard, click the + symbol next to Articles
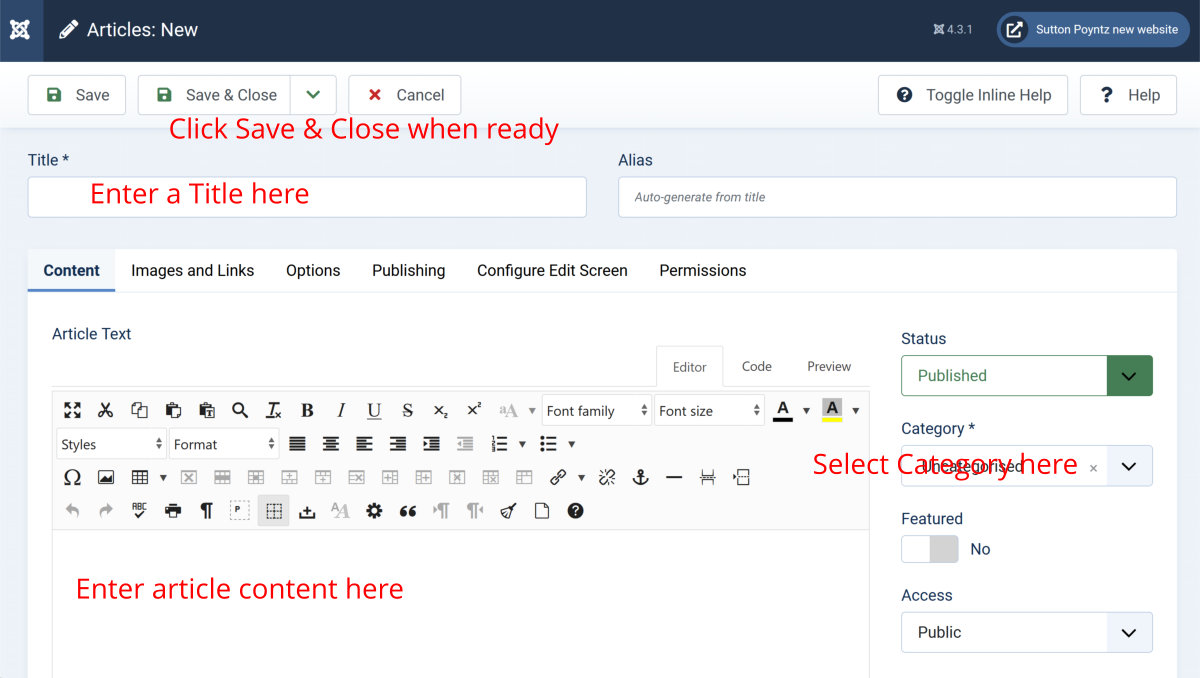
- You will be taken to the New Article page (see below).
- Give the new article a Title.
- If you wish, select a Category using the drop-down list.
- Click in the Article Text area (below the editor toolbar), and start editing content for the webpage.
- When you are ready, click Save & Close.
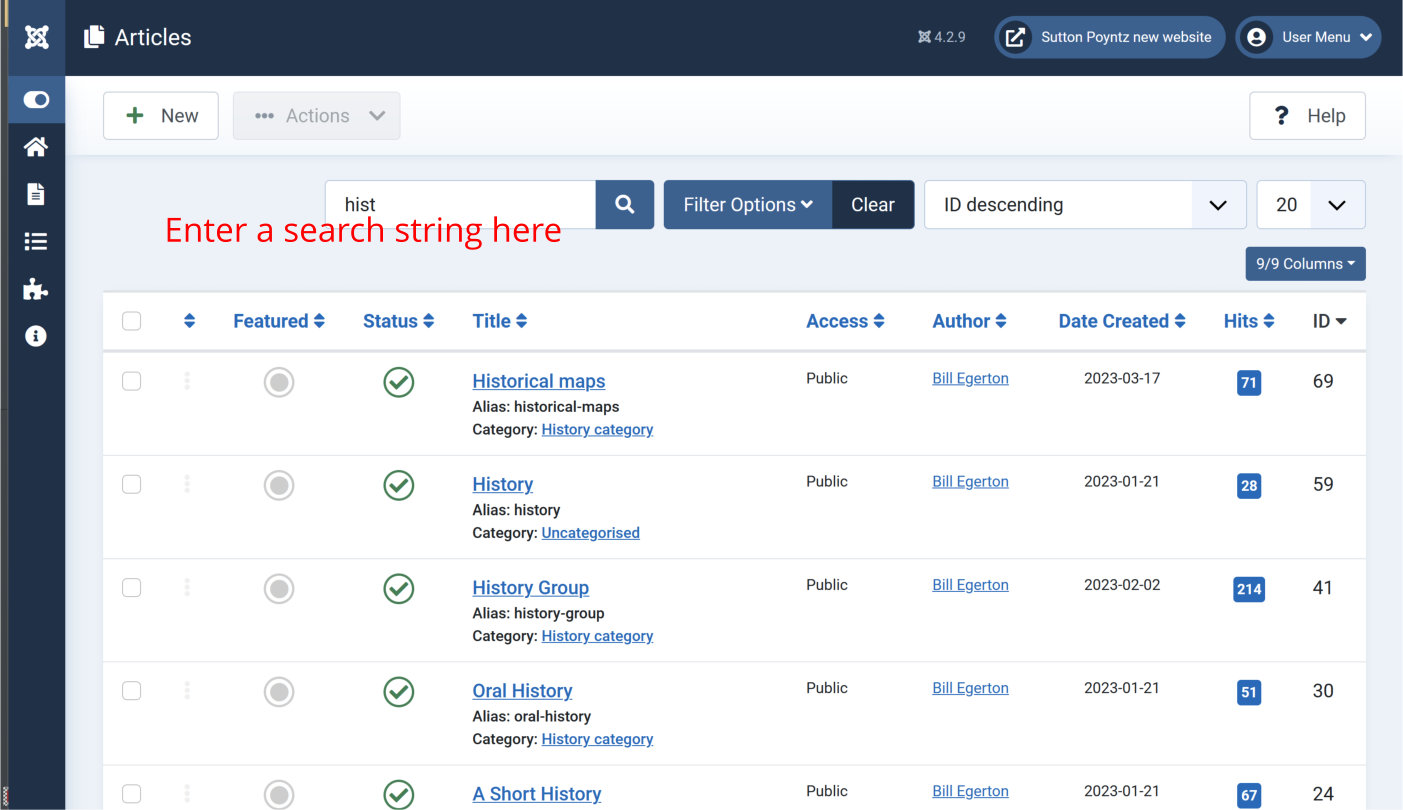
To edit an existing article, go to the Dashboard, and click the Articles button. You will be taken to a list of Articles in the website (as below). These are normally arranged most recent first. To find a particular article, you can enter part of the article's Title in the search box (the illustration below has applied a search for "hist"). There are other search criteria available in Filter Options.
When you have found the article you want to edit, simply click the article's Title to be taken to the Article Edit page.
If you select the article (by clicking the check-box to the left of the Title), you will find there are other actions available via the Actions menu: you can Unpublish the article so that it is no longer visible in the website, or Trash the article which is the first (reversible) step towards deleting it.
Before an article becomes a fully paid-up member of the website, it needs to be added to the website's Main Menu, and possibly to a Local Menu.
Main Menu:
The Main Menu is a hierarchical list of all the pages in the site. Level 1 of this hierarchy currently consists of seven pages: Home, What's On, Amenities, Community, History, Gallery and Contact Us. Below the What's On page, there are three Level 2 pages: News, Event and Diary. There is no limit to the depth of nesting allowed, but only the top 3 levels are actually displayed in the site's main menu (hence the need in some cases for Local Menus (see below).
To add a new article to the site's Main Menu, you first need to decide where the article should sit in the site's hierarchy. For example, if the new article is part of the site's Gallery, it will sit logically below the Gallery page, and if it is part of a Street Fayre section in the Gallery, it will sit at a lower level below a Street Fayre page. Having decided where the article sits, you now need to create its Main Menu item. Go to the Dashboard, click Menus in the left-hand vertical menu, and click the + symbol next to Main Menu. This will open up a menu item editor (see below).
Enter a Title for the menu item - you do not have to, but you can use the same as the article's Title. In the Menu Item Type box, you need to click the Select button, click Articles and then select Single Article (you will probably need to scroll down to find this option). A Select Article box will now appear; click Select in order to select your new article (which will probably be at or near the top of the article list).
You now need to click in the Parent Item box in order to find and choose the Main Menu item that this new article is to sit below in the site hierarchy. In the example above (a new article to sit in a Street Fayre section of the Gallery), you can search for Street in order to find the right menu item.
When you are ready, click Save & Close.

Local Menu:
As stated above, the site's main menu (the hamburger menu icon displayed top centre on every page) only opens up to level 3 of the site's hierarchy. This means that in parts of the site where there is a deeper level of page nesting, a Local Menu is needed. An example is the History Group area, where the History Group page itself is at level 3, and every other page sitting below History Group is inaccessible via the site's main menu.
I will assume that the new article you have created sits in an area where there is already a suitable Local Menu (instructions for creating a new Local Menu will be added later). To create a Local Menu item for a new article, go to the Dashboard, click Menus in the left-hand vertical menu, and click the + symbol next to relevant Local Menu (for example Biodiversity Group Menu). This will open up a menu item editor, as illustrated above. As before, you need to give this new menu item a Title, and select a parent menu item. There are one difference in the actions for a Local Menu item compared with a Main Menu item:
- In Menu Item Type, you need to select Menu Item Alias, which you will find in the System Links group. You will then see a Menu Item box; click Select here and find and select the Main Menu item that you have just created for this article.
At this stage, it is necessary to ensure that the Local Menu actually displays on the new article's webpage. To do this:
- In the Dashboard, click Content and then click Site Modules. This opens a list of what are called Modules, which are displayable entities used in the website. In this list, find and click the one for the applicable Local Menu (Biodiversity Group Menu) for example).
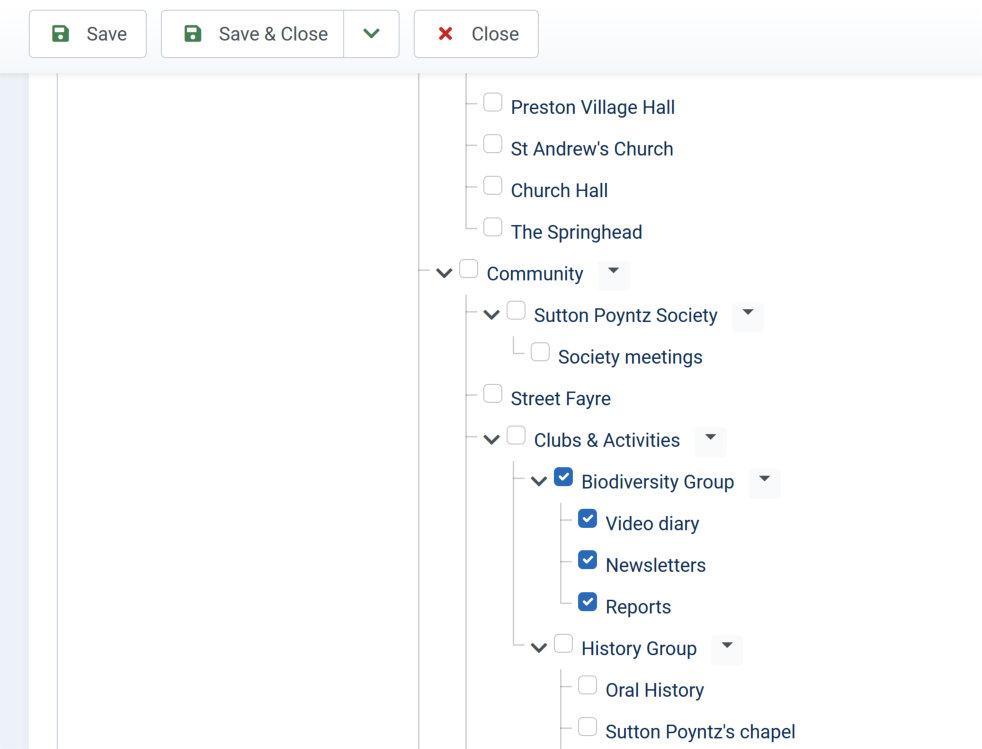
- This takes you to a Module Editor page. Click the Module Assignment tab; this takes you to a list of articles that this Local Menu is displayed on. Scroll down to find your new article (as in the illustration below), and click the check-box next to your article. Click Save & Close.
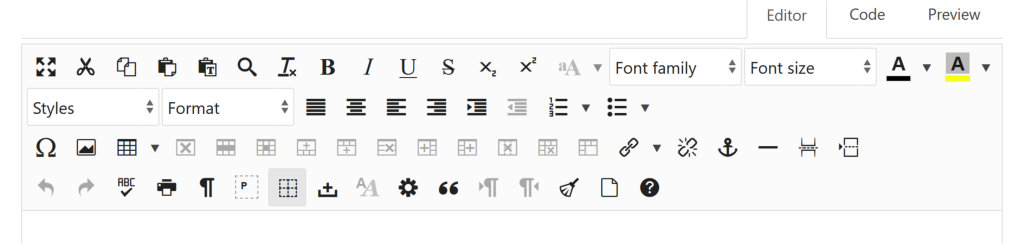
We use the JCE (i.e. Joomla Content Editor) editor. You will find comprehensive help on how to use the editor on the JCE Documentation pages. The Editors controls are displayed just above the text entry area, and will be as illustrated below - here is a very short summary of what the controls do:
- Editor/Code/Preview - The Editor button displays the usual WYSIWYG view of the article. Click Code to view (and edit) the underlying HTML code. Click Preview to see the article as it will appear on the website.
- Full screen - We recommend that you click this to do your editing in full screen mode. You will need to click it again before Saving your work.
- Cut & Paste group - Cut or Copy selected content, and Paste or Paste as plain text (i.e. ignoring any formatting in what has been copied) at a selected location. You can copy from elsewhere.
- Find - Find and/or replace
- Remove formatting for selected content
- Bold/Italic/Stikethrough/Subscript/Superscript - Text formatting controls
- Change case - Upper/lower/sentence/title case
- Font - Font family, font size, font colour and background colour
- Styles - A dauntingly large (but not necessarily hugely useful) set of predefined styles for the selected portion of text
- Formats - Predefined paragraph formats e.g. various Header formats
- Justification - Full, centre, left and right
- Indent - Increase and decrease
- Lists - Numbered and bulleted lists
- Special character - for a selection of non-standard characters, including Greek lettering, accented vowels, and characters such as €©…§¶½¼±°
- Insert image (or modify image)
- Insert table, plus table manipulation controls
- Link/Unlink/Anchor - You can enter the URL for another website, of use, for example, Menu to find and select a page in the Sutton Poyntz website. Anchor points define locations that can be linked to within a webpage
- Breaks - Horizontal line, Read-more (useful for long Newsbites), and Pagebreak (used to create multi-page articles such as this one)
- Undo and Redo
- Spell check - at present this is disabled by default
- Special character displays - Toggle the display of special characters, block elements and visula aids
- Insert non-breaking space character
- Edit CSS style of an element (i.e. the details of how it looks), and edit attributes (i.e. how it behaves)
- Text direction - toggle between left-to-right and right-to-left
- Check and clean up the HTML code for the article
- Start afresh - this will clear the whole article (after asking for confirmation!!!)
- Get help on the editor
To create a numbered or bulleted list, put the cursor where you want to add the list, and click the appropriate button (i.e. "ordered" or "unordered" list). If you click the drop-down arrow next to the button, you will be offered a choice of list types (for example alphabetic or Roman numerals rather than simple numeric ordering, and different bullet characters).
Enter content for the first list item, then click the ENTER button to move on to the next item. At this point you can click the TAB button, or the Increase indent icon, to start a list-within-a-list. After entering items for this inner list, click SHIFT-TAB or Decrease indent to go back to the previous level of indentation.
At any time, you can use the Oredered list or Unordered list button to change the type of list and/or the bullet or numbering being used. This will apply to all the items at the current level in the current list.
For how to add an image gallery, see a later page. To add a single image to your article, put the cursor where you want the image to go, and click the Insert Image button. This will take you to an Image Manager window (see below), wher you can select the image and control the way it looks.
The bottom-left portion of the Image Manager provides a folder tree, and allows you to navigate around the server folders that hold the media accessible on the website. The top-level media folder on the server is actually called /images, but is shown here as Home. Click on a folder to select it, and to show its sub-folders and other contents. There is a New Folder button which allows you to create a new sub-folder within the currently selected folder.
The bottom-centre area is a file list for the currently selected folder, showing files and sub-folders. If you click on a file name here, you will see (bottom-right) a thumbnail and information for the selected file. A link for this file will be placed in the URL box above. To the right of the file information box there are some icons that allow you to delete a file, rename it, or move it.
It is also possible to upload an image from your own computer, using the Upload button. This is a fairly basic file uploader, with fewer facilities than the Media Manager which can be accessed from the Dashboard.
When you have selected an image to add to your Article, you can control how it will appear using the controls in the top half of the Image Manager:
- Alternate Text - This is what will display as a popup when you hover over the image in the website;
- Dimensions - This is where you can control the size of the image in the website. An excellent trick is to set the width (the first Dimensions box) to a percentage of the available space (80% for example) and to delete the height. Leave Proportional ticked. The image will then shrink and grow as the available window size decreases of increases;
- Alignment - You can set the image to appear left-, centre-, or right-aligned;
- Clear - When Alignment has been set, this allows you to prevent text appearing to the left and/or right of the image;
- Margin - This allows you to set the spacing between the image and nearby text;
- Border - This allows you to draw a border around the image, of specified line width, line type, and colour (N.B. You may need to scroll down the Image Manager to see the last options here).
An Advanced tab gives access to some more advanced controls over the behaviour of the image, which can be of use to those familiar with HTML and CSS - for example this can be used to create an image with overlaid text.

Captions: There is no easy method for adding a caption to an image. The best we can recommend is to create a 1x1 table (see the next page), and then to add the image and caption text inside the table cell. It is possible to set the width of the table, its position (to the left, right, or centre of the window), and also to add padding as white spacing between the image and other content. By setting the image width to 100%, it will occupy the full width of the table cell (minus the padding).
First, one annoying feature of the JCE Editor is that if you insert a Table at the end of an Article, you are then not able to point the cursor to after the table, in order to add more text. A work-round is as follows:
- Place the cursor anywhere within the table;
- Click the word Table in the line that says Path, just below the Editor window - this will select the whole table (there are other ways of doing so, but this is the easiest);
- Now press CTRL-X or click the Cut icon - this will cut the whole table, replacing it with a blank line;
- Press ENTER to add another blank line, and click the UP arrow;
- Now press CTRL-V this will paste the deleted table back into the Article, but with a blank line below.
This annoyance can affect Tables at the end of pages or other types of sections, and can also be the case with, for example, images.
Creating a table
 Put the cursor where you want the table to be, and click the Insert a table button; if you click the drop-down arrow next to the button, you will be given a graphic (as illustrated to the right) that allows you to choose the number of rows and columns in the table; if you click the button itself you will be given a pop-up window (illustrated below) that allows you, among other things, to set the table size numerically, in the Cols and Rows boxes.
There are a number of options that specify how the table will display and behave. If you clicked the Insert a table icon itself, you will see these options, but if you used the drop-down arrow, you need to put the cursor anywhere in the table, and either right-click and select Table properties or click the Insert a table icon, Here, you can specify the width and/or height of the whole table, in pixels or as a percentage of window width. You can also set the horizontal spacing between columns, and the padding between cell border and cell contents. Finally you can set the position for the whole table (left, centre or right), and specify the width of the border around the whole table.
Click the Advanced tab to get other options: of particular interest this allows you to set the colour and line type of the table's border, and to set a background colour or even background image for the table. For advanced users, a CSS style can be specified giving even more control over how the table looks.

Controlling how table cells look
Select a cell (or a number of cells) and click the Table Cell Properties icon (or right-click, select Cell, and select Table Cell Properties). It is possible here to set the width of the cell(s) (either in pixels or as a percentage of the table width), and also the cell's height. You can also specify both the horizontal and vertical alignment of the cell's content. If you click the Advanced tab, you will be able to define the cell's border colour, line width and line type, and also the background colour for the cell(s).
Irrespective of what cells you selected before clicking or selecting Table Cell Properties, when you save the cell formatting, you can apply it to a whole row, or to the whole table, by clicking Update current cell (bottom left) and choosing Update all cells in row or Update all cells in table, before clicking Update.

You can set many types of content (text, images, etc.) so they act as a link - when the text or image displayed in the website is clicked, it will redirect the browser to another webpage. To do this, select the content that you want be act as a link, and click the Insert link button. If you know the URL (i.e. internet address) that you want the link to be directed to, you can click the down-arrow next to the button and enter the URL, but it will normally be better to click the Insert link button itself. This opens a Link popup window (illustrated below), which allows you in some detail to control what the link does.
The Link popup window gives access to several different types of link, as follows:
- To link to a page in another website, enter the page's address (i.e. URL) in the URL box;
- To link to a page in the Sutton Poyntz website, it is better to click Content; this opens up a list of pages in the site, arranged by category. Find and select the page you want to link to. This will generate a robust link which will continue to work even if the whole site is moved to another location;
- To link to a document on the Sutton Poyntz website server, click the Browse document icon (see illustration below). This opens up a File Browser popup window with a list of folders and files on the server. You can upload a file from your own computer if necessary. Select the file to create a link which will open up the file.
- To create a "mail-to" link (which will create an email when clicked), enter an email address in the URL box. This will be detected automatically, and you will be asked if you want a mail-to link.
Usually, a link will stay in the same browser window, but it is possible to create a new window for the link, by selecting Open in new window in the Target box.
Click the Insert button to create the link.

Lightbox: A "lightbox" is a temporary pop-up window, created when a link is clicked in order to display material such as images, video, etc.
A "gallery" is a set of such material (usually images) displayed in a lightbox with forward and back arrows that allow the user to scan through them.
To make a link open up a lightbox, create the link (as shown on the previous page), but before saving the link, click the Advanced tab, and enter boxplus in the Relationship page to target box.
To create a gallery, one creates a number of such links, and adds a gallery name or number after boxplus in the Relationship page to target box. Each link in the gallery must have the same gallery name - for example you could have each one set to boxplus1, or to boxplus_springhead.
Important - In order for this mechanism to work, it is necessary for the text ![]() boxplus /} to appear earlier on in the article. This is an instruction to tell Jooma to be ready to create a lightbox - it does not appear in the displayed article.
boxplus /} to appear earlier on in the article. This is an instruction to tell Jooma to be ready to create a lightbox - it does not appear in the displayed article.
Gallery: An image gallery can be displayed extremely simply, by including a command of the form ![]() gallery}banners
gallery}banners![]() /gallery} (where you replace banners with your chosen image folder). This will cause an image gallery to be displayed in the article, showing thumbnails of all the images in the chosen image folder. These images can be clicked in order to display the images, larger, in a lightbox. Various parameters can be set in order to control how the gallery is displayed, by adding parameters after the opening gallery. For example,
/gallery} (where you replace banners with your chosen image folder). This will cause an image gallery to be displayed in the article, showing thumbnails of all the images in the chosen image folder. These images can be clicked in order to display the images, larger, in a lightbox. Various parameters can be set in order to control how the gallery is displayed, by adding parameters after the opening gallery. For example, ![]() gallery cols=6}banners
gallery cols=6}banners![]() /gallery} will display 6 thumbnail images across the page, rather than the default 3. Go to https://hunyadi.info.hu/sigplus/ for an explanation of all the available parameters. The example below, using the command
/gallery} will display 6 thumbnail images across the page, rather than the default 3. Go to https://hunyadi.info.hu/sigplus/ for an explanation of all the available parameters. The example below, using the command ![]() gallery cols=6 rotator_delay=3000}History/images/1984Brookmead
gallery cols=6 rotator_delay=3000}History/images/1984Brookmead![]() /gallery}, displays the images in folder /images/History/images/1984Brookmead, with a 3-second scrolling delay:
/gallery}, displays the images in folder /images/History/images/1984Brookmead, with a 3-second scrolling delay:


Note that the number of columns needs to be set to fewer than the number of images in the folder - if not, then the images scroll to the left but are not replaced from the right.
Image titles and captions: By creating a text file called labels.txt in the image folder, titles and captions can be very easily displayed with the gallery, as has been done in the example shown here. This text file contains a series of rows of the form
imagefilename|title|caption
each row containing the file name of one of the images, a title, and a caption, separated by vertical bars.
Video: The preferred method of including video clips is to upload the video to YouTube, and to add a link to the YouTube page. YouTube can play single video clips or "playlists" (consisting of multiple clips linked together). It is possible to play the YouTube video or playlist in three separate ways - see the examples here:
- Firstly, the video can be played as a YouTube page - click here for an example - to do this:
- Go to the YouTube page that displays the video, right-click in the video and select Copy video URL (an alternative is to click the Share button below the video, and click the blue Copy button);
- Now in the article editor select the text that is to form the link, click the Insert Link button, and in the URL box click CTRL-V to paste the YouTube link;
- If you wish, click in the Target box and select Open in new window, so that the YouTube video will play in a new browser window;
- Click Insert.
- Second, the video can appear in an area of your article that you set up for the purpose, as illustrated in the frame to the right; this is achieved by the following:
- Go to the YouTube page that displays the video, right-click in the video and select Copy embed code (an alternative is to click the Share button below the video, clicking the Embed button, and then clicking the Copy button);
- Now go to the article editor. Click the Code tab (top right). Find the place where you want to insert the video frame (as you are now looking at the HTML code for the article, rather than what the article actually looks like, this can be tricky - it might help if before clicking the Code button, you enter some easily findable text like THIS IS WHERE I WANT THE VIDEO TO GO). When you have found where the video frame is to go, click CTRL-V to add the YouTube embed code;
- Now click the Editor tab (top right). You should again see the article as it will appear in the website, but with the YouTube video frame embedded.
- Formatting: Before you click the Editor tab, the code for the video frame will look something like <iframe width="846" height="478" src="https://www.youtube.com/embed/6EbCscxUFwY" title="buzzard2 june23" frameborder="0" allow="accelerometer; autoplay; clipboard-write; encrypted-media; gyroscope; picture-in-picture; web-share" allowfullscreen></iframe>. If you wish, you can modify the frame width, ensuring you change height and width by the same factor. It is also helpful to add style="float:right;" (or float:left or float:center) between iframe and width= - this determines where in the browser window the video frame will appear. Finally, you can add something like margin-left:30px; and/or margin-right:30px; before the word float in the above, to create some white space between the article text and the video frame.
- Finally, it is possible to display the YouTube video in a lightbox that opens up temporarily for the purpose - click here for an example. Fortunately, this is much easier than the method just described. Here is what you need to do:
- Go to the YouTube page that displays the video, right-click in the video and select Copy video URL (an alternative is to click the Share button below the video, and click the blue Copy button);
- Now in the article editor select the text that is to form the link, click the Insert Link button, and in the URL box click CTRL-V to paste the YouTube link;
- You now have to edit the link in the URL box, by substituting youtu.be with www.youtube.com/embed. The link will now look something like https://www.youtube.com/embed/6EbCscxUFwY;
- Now click the Advanced tab at the top of the Link window, and enter the word boxplus in the Relationship page to target box;
- Click Insert.
- This uses the BOXPLUS extension to display the popup lightbox. As described in the section of this Guidance on lightboxes, you need to add the instruction
 somewhere earlier in the article, in order for the request to use a lightbox to be recognised.
The guidance given above describes how to add a single video clip to an article. YouTube can also play PLAYLISTS, and there are some subtle differences to how playlists are added.
- To play as a YouTube page (click here for an example), do exactly the same as for a single video clip (item a above), having first found the required playlist in YouTube;
- To play in a frame on your own page, (see example to the right), again do as in item b above, having first found the required playlist;
- To play the playlist in a lighbox (as in the example here), follow the instructions for item c above, but at step 3, further editing of the URL is required. The link initially copied into the URL box in the Link window will look something like https://youtu.be/D1qfznb1KKA?list=PLda_tXFlrspkSvApLjpfHJU3zco5h_m49. As before, it is necessary to replace youtu.be/ with www.youtube.com/embed, but in this case the 11 character video-clip code needs to be removed, and listType=playlist& must be inserted before list=. The original URL shown above will therefore become https://www.youtube.com/embed?listType=playlist&list=PLda_tXFlrspkSvApLjpfHJU3zco5h_m49.
Audio:
Adding an audio clip is very similar to the method for adding a document (see above):
- Use the Media Manager to copy the audio clip to a suitable place on the server;
- Create text in the article that is to link to the audio clip;
- Select the text and click the Insert Link button;
- Click the Browse button (top right) and use the File Browser to find and select the audio clip;
- Click the Insert button to create the link.
A multi-page article divides its content into a number of pages, with an index that allows a person to skip quickly from one page to another: this guidance article is an example of a multi-page article, as illustrated below.

To create a mullti-page article, or to add a new page, put the cursor where you want the page break to be, and click the Insert pagebreak button. You will be asked for a Page Title, and an Alias for the new page. The Page Title appears next to the Article Title at the head of the displayed page ("Publishing an article" is the Page Title in the example displayed above). The Alias is what appears in the Article Index ("publishing-article" in the example). The Alias and Page Title can be exactly the same if that is what you want, or the Alias can be abbreviated in some way - these are both freeform text boxes with no rules about the content.
News
This page automatically includes all the articles of category "News items". To add a new Newsbite, create a new article of this category.
Newsbites are initially written as Articles, which are then copied (by Copy and Paste) into an email for distribution to the village. Generally, Newsbites are written as an introduction followed by the main text, with an optional Read-More inserted at the end of the introduction (not needed for short Newsbites). For the Newsbites to be listed on the website in date order, it is important that the article Title is of consistent form, in the form "Newsbite yymmdd newsbite title". We recommend that each Newsbite should start with a logo for the issuing organisation (Sutton Poyntz Society, Mission Hall, etc.), a date, and a title. To assist in including the appropriate logo, title, etc., it is often sensible to open an existing Newsbite article and use Save as Copy to create the new article.
Each new Newsbite should be in an Article of Category "News items". This will ensure that the Newsbite is published automatically in the website's News page. If the rules above are followed, the Newbites will be published in date order. It will also ensure that the Newsbite is published in the Newsbite Archive page (see below).
After a time, the articles for Newsbites that are no longer current should be opened, and the Category should be changed to "Old News items". The Newsbite will still be available via the Newsbite Archive page, but will not be published on the News page.
Events
This page can display a number of event posters, as a slide-show.
Add a new event slide as follows:
- In the administrator home page, click Site Modules (found in the Content section of the menu down the left-hand side);
- Find and click the module called Events.
- Select the Source tab, and click Add a slide.
- Select Text, and if necessary Custom text (this is the default). Then add a Title and a Description for the event.
- Select Image, and click the Select and image icon. This opens a window in which you can find and select an image from the Site's Media area. Navigate to the Events folder; then (if necessary) use Upload to copy an image file for the event from your computer the the site server (you can use Drag and Drop). Now select the event's poster image.
- Select Dates, and enter an end date (presumably on or after the date of the event) after which the event slide will no longer be displayed.
- If you wish, you can click Link and enter the URL address of a web-page (for example a Newsbite) that contains more information.
- Click Save and Close
From time to time, tidy up by selecting and deleting old event slides listed in the Events module.
Diary
This page automatically displays the contents of two Google Calendars, maintained by the Sutton Poyntz Society and the Mission Hall, plus a Google-standard Public Holidays calendar.
The code for displaying these calendars is:
<iframe src="https://calendar.google.com/calendar/embed?height=500&wkst=1&bgcolor=%23ffffff&ctz=Europe%2FLondon&hl=en_GB&showTitle=0&src=c3V0dG9uLnBveW50ei5taXNzaW9uaGFsbEBnbWFpbC5jb20&src=ZW4tZ2IudWsjaG9saWRheUBncm91cC52LmNhbGVuZGFyLmdvb2dsZS5jb20&src=c3V0dG9uLnBveW50ei53ZWJzaXRlQGdtYWlsLmNvbQ&color=%23039BE5&color=%23E4C441&color=%23D50000" width="90%" height="500" style="border: solid 1px #777;" frameborder="0" scrolling="no"></iframe>
This code displays three calendars - Holidays in the UK (in yellow), Mission Halll (in cyan), and Sutton Poyntz Society (in brown). Each calendar is displayed by including a pair of parameters of the form
src=ZW4tZ2IudWsjaG9saWRheUBncm91cC52LmNhbGVuZGFyLmdvb2dsZS5jb20
color=%23E4C441
Each of these parameters is preceded by an ampersand character, which is included in the form &. The color parameter sets the icon colour for the calendar; the src parameter provides a Google-defined Identifier for the calendar.
To add another calendar, once it has been created in Google, get the Google Calendar identifier by (in Google Calendar) as follows:
- clicking the Settings icon;
- selecting the new Google Calendar;
- in the Integrate calendar section, find and copy the Identifier from the calendar's iframe code.
For this to work for all visitors to the website, the Google Calendar needs to be made public.
The Society Minutes page contains a list of recent Minutes, arranged by year. Each year's Minutes are stored in a folder which can be accessed via the Media button - this give access, allowing new Minutes files to be added, and additional folders to be added for a new year.
When a new folder is added for a new year, a list for this folder needs to be added to the Society Minutes page. This is displayed by means of a ![]() loadposition position} instruction in the Society Minutes page text; this instruction loads a Site Module (actually it loads all Site Modules that have been created for the named position. The following instructions are for 2024, but make the obvious amendments for future years.
loadposition position} instruction in the Society Minutes page text; this instruction loads a Site Module (actually it loads all Site Modules that have been created for the named position. The following instructions are for 2024, but make the obvious amendments for future years.
- First, go to Media and create an appropriate sub-folder in the server's /images folder - we will assume this is /images/SPSociety/Meetings/2024/Minutes.
- Now go to Site Modules (via Content), and find one of the existing folder listing modules, for example the one called societyminutes2023. Open this module.
- In the Title box, change 2023 to 2024.
- In the Location box, change 2023 to 2024.
- In the Position box, type societyminutes2024 (it is not possible to edit the contents of this box).
- Now click the down arrow to the right of Save & Close, and select and click Save as Copy (please do not click the Save & Close button itself, as this will lose the minutes for 2023. Click the Close button.
You can now edit the Society Minutes article to add a folder list for 2024, by adding the tag ![]() loadposition societyminutes2024}.
loadposition societyminutes2024}.
The village archive consists of two components (a) the full set of Newsbites (N.B. work in progress to add old Newsbites) and (b) a number of documents lodged on the website server by village organisations including the Sutton Poyntz Society, the Biodiversity Group and the History Group. In addition, the Archive page has a link to the Gallery page, for which guidance is available above.
Newsbites
See above (What's On) for how to create a Newsbite article. If the rules described there are followed, then all Newsbites will automatically by included, in date order, in the Newsbite archive.
Document archive
A Document Archive webpage displays a list of selected folders in the website's /images/documents folder, and allows a drill-down through sub-folders to the document files.
To add a complete new sub-folder to the /images/documents folder, use Media to drill down to where the folder is to be added (by clicking in the folder list on the left), Click the Create new folder to add a new folder. Click on the new sub-folder's name in the list on the left to enter the new sub-folder.
To add a file or files to a sub-folder, enter the sub-folder (by clicking in the folder list on the left). Use the Upload button to select files from your own computer to upload to the sub-folder. N.B. We recommend that files to be displayed in the website Archive page should only go in the lowest-level folders - do not mix files and sub-folders in the same folder as this makes the document display less easy to use.
Once you have added new sub-folders and files, it is necessary to add them to the database of folders and documents for display in the Document Archive webpage. To do this, click jDownloads in the Components section of the Joomla control panel. Select Control Panel. Now click Check Download Area, and select Full Scan. The software will analyse changes to the /images/documents folder area; after a pause a new window will appear listing new sub-folders (which are called Categories) and files (which are called Downloads). Click the Make the changes permanent button to confirm the changes. At this stage, you may get an error message, which you can (I think) ignore.
The new Categories (i.e. sub-folders) and Downloads (i.e. files) that have been introduced by the above process will initially be Unpublished, and therefore not visible in the Document Archive page. Select Categories in the jDownloads control panel. This will list all the sub-folders in /images/documents. Find the sub-folders that you have just created, and click the X icon next to the sub-folder name in order to Publish the sub-folder; this will automatically publish all the files in that sub-folder.
You can add a description to a document, which will be displayed with the file name in the document archive. To do so, select Downloads in the jDownloads control panel, find and open the entry for the required file, and enter text in the Short description box. You can also specify which files are or are not to be included in the displayed document archive; to do so, select Downloads in the jDownloads control panel, find the file that you want to unpublish or publish, and click the Tick or Cross next to the file name to change its status. (N.B. Files are automatically published when a whole Category is published, but will be set as unpublished if you have added a new file to an existing Category).